Preparing to Disassemble Your Office Chair
Before you start to disassemble your office chair, preparation is key. This initial step ensures a smooth, hassle-free process. Here’s how you can effectively prepare for this task.
Gather Necessary Tools
Disassembling an office chair requires specific tools. Ensure you have these tools on hand:
- A screwdriver (Phillips and flathead)
- Pliers
- An Allen key
- A mallet or hammer
- A soft cloth or towel to protect your work surface
Having these tools ready will help you avoid any interruptions once you start the disassembly process.

Safety Precautions and Workspace Preparation
Safety first—ensure your workspace is safe and suitable for disassembly. Follow these tips:
- Choose a clean, flat surface to work on.
- Make sure the area is well-lit.
- Keep sharp tools out of reach of children.
- Lay down a soft cloth or towel to protect the chair and surface from scratches.
Preparing your work environment carefully prevents accidents and helps protect your office chair during the disassembly process.
Removing Wheels and Base
Once you have prepared your tools and workspace, start with the bottom of the chair.
Tips for Detaching the Wheels
Detaching the wheels is your first step. Here’s what to do:
- Turn the chair upside down for easy access to the wheels.
- Use pliers to grip and pull out each wheel.
- Apply a little force if they stick, but be gentle to avoid damage.
It helps to work one wheel at a time.
Techniques for Separating the Base from the Chair
After removing the wheels, you will see the base detachment.
- Hold the chair base firmly with one hand.
- Use a mallet to tap the center pin out from the stem.
- If the base seems stuck, a bit of lubricant can help ease it off.
Always shield your hands with a cloth while tapping with the mallet. Proceed with care to avoid any harm to yourself or the chair parts.
Taking Off the Cylinder
Removing the cylinder is a key step in disassembling your office chair.
Understanding the Cylinder’s Function
The cylinder is crucial for chair height adjustment and swivel. It’s the chair’s support system.
Step-by-Step Cylinder Removal Instructions
To remove the cylinder, follow these steps:
- Turn the chair over to expose the cylinder at the base.
- Locate the retaining clip at the cylinder’s bottom.
- With a flathead screwdriver, carefully pry off the clip.
- Grasp the cylinder and pull it away from the base.
- If it resists, use a rubber mallet to tap it gently free.
Handle each step with care to avoid damaging the chair’s parts.
Disassembling the Armrests
After successfully removing the wheels and base, the next step in how to disassemble an office chair is to focus on the armrests. Proper removal of the armrests not only ensures that you avoid damage to the chair but also simplifies the disassembly process.
Locating Attachment Points
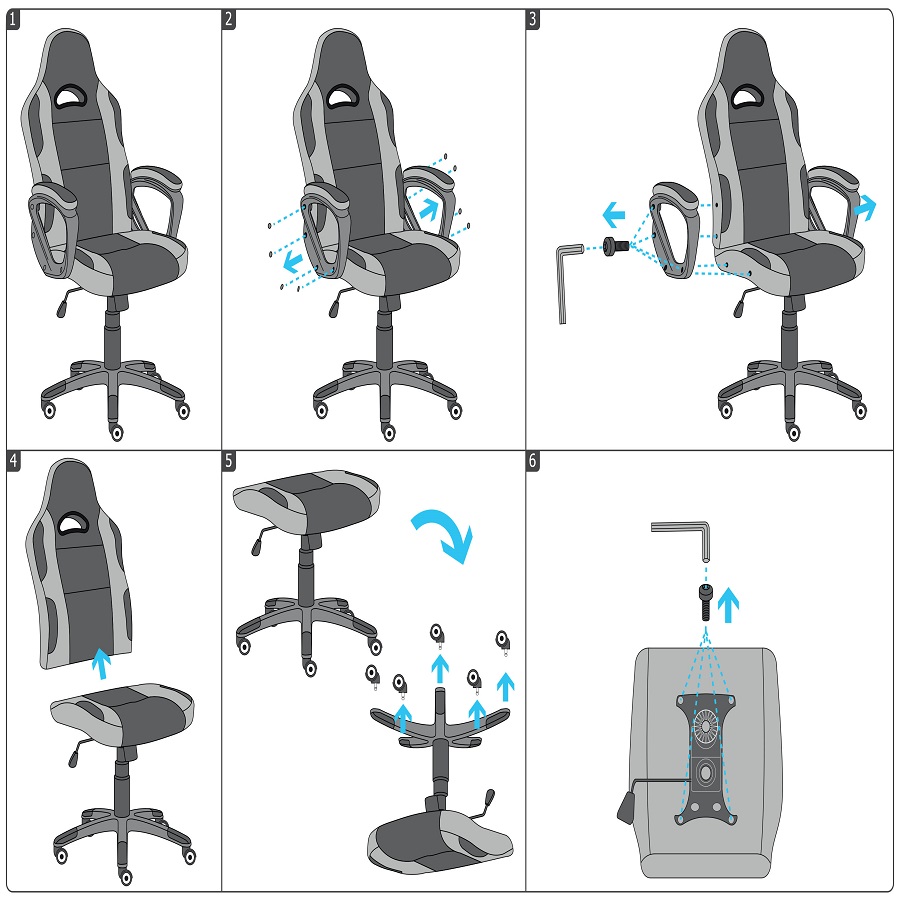
The first task is to find out where the armrests attach to the chair. Different models may have unique attachment styles, but generally, look for screws or bolts. These will be the points where you’ll apply your tools.

Procedure for Removing Armrests Safely
Once you’ve found the attachment points, use your screwdriver or Allen key to loosen and remove the bolts or screws. Hold onto these fasteners; you’ll need them for reassembly. Gently lift the armrests away from the chair once they’re free. Guide them carefully – slow and steady wins the race here.
To reiterate, it’s important to keep track of all the parts and tools. While disassembling your office chair, this approach will help when it’s time for reassembling or if you need to replace specific elements. Now that the armrests are detached, take a moment to clean them and perform any needed maintenance.
Detaching the Seat and Backrest
When you’ve dealt with the other parts of the chair, it’s time to focus on the seat and backrest.
Identifying Connection Points
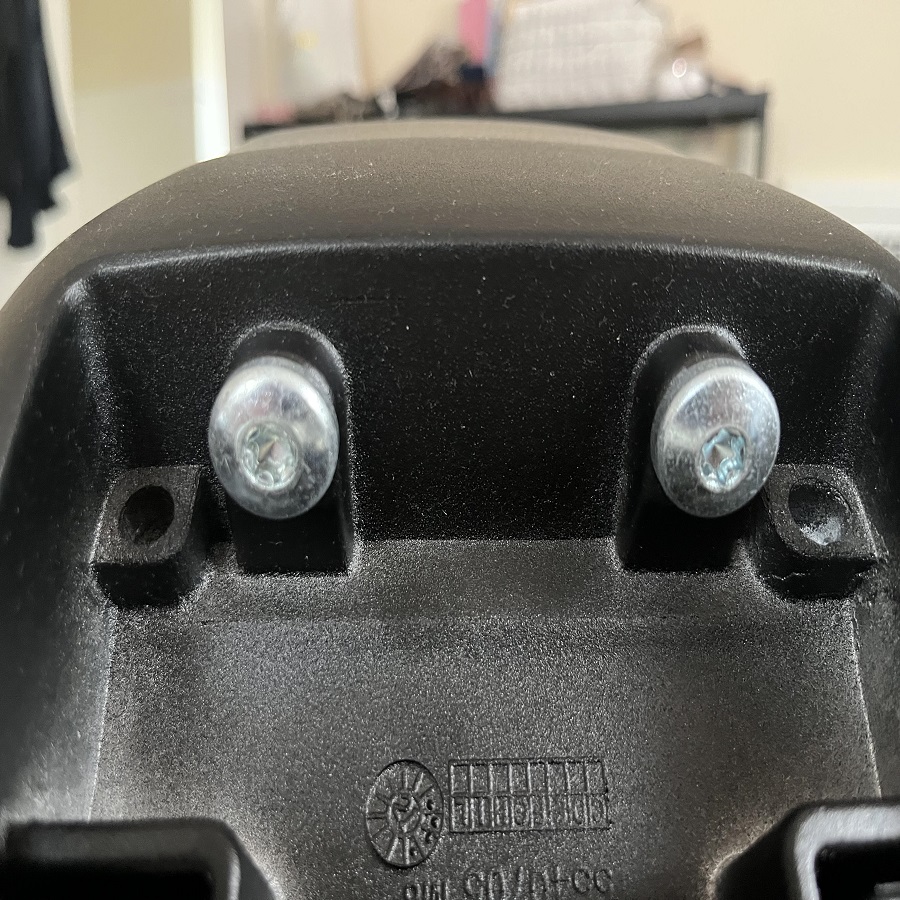
Start by turning the chair on its side or upside down. This will expose the undersides where the connection points are. Look for visible screws or bolts securing the seat and backrest to the chair’s frame. Use a flashlight if the area is dim, to make sure you spot all of them.
Steps to Remove the Backrest and Seat
With the connection points spotted, take your screwdriver or Allen key. Begin with the backrest. Unscrew each bolt and pull the backrest gently away from the frame. Be firm but careful to prevent any damage. Do the same with the seat. Once all screws are removed, lift the seat. Sometimes, the seat and backrest might clip together. If so, release these clips carefully. Place the removed parts on your soft cloth or towel.
As you disassemble the office chair, keep screws and bolts in a container. This helps when you reassemble or need to replace parts.
If you wish to clean or maintain these pieces, now is a good time. Wipe down every part. Check for wear on the connections.
Removing the seat and backrest might feel tricky, but with the right tools and steps, it is manageable. The insight on how to disassemble an office chair for these sections will simplify your task.
Office Chair Maintenance Post-Disassembly
After you have disassembled your office chair, maintenance is crucial. It ensures parts stay in good condition, whether you’re moving, storing, or planning to reassemble.
Importance of Keeping Track of Disassembled Parts
Keep all screws, bolts, and parts together. Use bags or containers to organize them. Label each bag with the part’s name for easy identification. This prevents losing pieces and saves time when reassembling or replacing parts.
Routine Maintenance Tasks to Perform
Now is the best time for maintenance. Clean each part with a soft cloth. Tighten any loose screws or bolts. Check for damage on all parts. Perform these tasks now, so your chair remains sturdy and functional in the long term.
Performing regular cleans and checks on the parts extends the life of your chair. This approach to disassembling and maintaining your office chair aids in keeping its functionality. Moreover, it prepares you for a potential upgrade or sale.

Choosing Your Next Office Chair
Once you understand how to disassemble an office chair, you may consider getting a new one. The array of options can be overwhelming, but with a few key points in mind, you can make an informed decision that suits your needs.
Exploring New Office Chair Options
After dismantling your office chair, explore the market for a new one. Look for chairs that offer:
- Comfortable cushioning
- Adjustable height and armrests
- Durable materials
- Good lumbar support
- Easy-to-clean fabric
- Swivel and mobility features
Discover chairs that align with your personal and workspace requirements. Remember to consider the chair’s purpose. Different tasks demand different chair designs.
Advice on Selecting the Right Office Chair
Selecting the right office chair involves assessing your daily needs. To choose wisely, here are some tips:
- Test before buying: Sit in various chairs to gauge comfort and support.
- Check reviews: Read what others say about the chair’s longevity and comfort.
- Compare prices: Find a chair that offers the best value within your budget.
- Consider space: Make sure the chair fits well in your workspace without crowding.
- Look for warranty: Opt for chairs with a warranty to ensure long-term use.
Incorporating the keyword ‘how to disassemble an office chair’ in your search may reveal chairs designed for easy assembly and future disassembly, enhancing their appeal.


