Office chairs are a staple in many work environments, offering comfort and support during long hours of work. However, one common issue that many users face is a squeaky office chair. The persistent noise can be distracting and irritating, disrupting your focus and productivity. In this article, we’ll delve into the ultimate solutions for fixing a squeaky office chair, covering common causes, diagnostic steps, and practical repair methods.
Understanding the Causes of a Squeaky Office Chair
The Mechanics Behind the Noise
A squeaky office chair typically results from the movement of various mechanical components. The chair’s frame, base, or adjustable parts may produce noise due to friction, wear, or lack of lubrication. Over time, these components can develop rust, dust, or grime, which exacerbates the squeaking sound. Identifying the exact source of the noise is crucial for effective repair.
Common Problem Areas
Several areas of an office chair are prone to developing squeaks:
- Gas Lift Cylinder: This component allows you to adjust the height of the chair. Over time, it can become loose or dry, leading to squeaking.
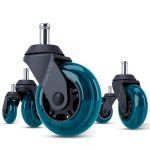
- Base and Casters: The wheels and base of the chair can accumulate dirt or become loose, causing noise when moving or swiveling.
- Seat Mechanism: The mechanism that allows the seat to tilt or recline can become worn or misaligned, producing squeaky sounds.
Diagnosing the Source of the Squeak
Step-by-Step Diagnostic Process
To effectively address the squeaking noise, you need to diagnose the problem accurately. Start by performing a systematic check of the chair’s components:
- Check for Loose Screws and Bolts: Tighten all visible screws and bolts on the chair. A loose screw can often cause or worsen squeaking.
- Inspect the Gas Lift Cylinder: Sit in the chair and adjust its height while listening for the noise. If the noise persists, the gas lift cylinder might need attention.
- Examine the Base and Casters: Move the chair around to see if the squeak comes from the wheels or base. Dirt and debris can often get trapped in the casters.
- Test the Seat Mechanism: Tilt and recline the seat to determine if the squeak comes from the mechanism that allows these adjustments.
Tools and Materials Needed
Having the right tools and materials on hand will make the diagnostic process smoother:
- Screwdriver Set: For tightening or loosening screws and bolts.
- Lubricant: A silicone-based or Teflon lubricant can help address issues with moving parts.
- Cleaner: A mild cleaner can help remove grime and dirt from the chair’s components.
How to Fix a Squeaky Gas Lift Cylinder
Cleaning and Lubricating the Gas Lift Cylinder
If the gas lift cylinder is the culprit, cleaning and lubricating it can resolve the issue:
- Remove the Chair Base: Carefully disassemble the chair base from the gas lift cylinder. This might require a screwdriver or wrench.
- Clean the Cylinder: Wipe down the cylinder with a cloth to remove any dust or debris. Ensure it is thoroughly clean before proceeding.
- Apply Lubricant: Spray or apply lubricant to the cylinder’s moving parts. Avoid over-lubricating, as excess lubricant can attract dust.
- Reassemble the Chair: Once the lubricant has been applied, reassemble the chair and test it to see if the squeak has been eliminated.
Replacing the Gas Lift Cylinder
If cleaning and lubricating do not resolve the issue, consider replacing the gas lift cylinder. This involves:
- Purchasing a Replacement Cylinder: Ensure the new cylinder matches the specifications of your chair.
- Removing the Old Cylinder: Carefully detach the old cylinder from the base and seat.
- Installing the New Cylinder: Insert the new cylinder into place and reassemble the chair.
Fixing Squeaky Casters and Chair Base
Cleaning and Lubricating Casters
Casters can often become clogged with dirt or debris, leading to squeaking. Follow these steps to clean and lubricate them:
- Remove the Casters: Detach the casters from the chair base. This usually involves pulling them out or unscrewing them.
- Clean the Casters: Use a brush or cloth to remove dirt and grime from the casters. If necessary, use a mild cleaner.
- Lubricate the Casters: Apply lubricant to the caster wheels and the swivel mechanism. Ensure it is evenly distributed.
- Reattach the Casters: Once clean and lubricated, reattach the casters to the base and test for any remaining noise.
Addressing a Squeaky Chair Base
If the base itself is squeaking, you might need to:
- Check for Loose Components: Tighten any screws or bolts connecting the base to the chair’s frame.
- Lubricate the Joints: Apply lubricant to any joints or moving parts in the base. This will reduce friction and noise.
Repairing the Seat Mechanism
Identifying and Fixing a Faulty Mechanism
The seat mechanism, which controls tilting and reclining, can sometimes be the source of squeaks:
- Inspect the Mechanism: Check for any visible wear or damage. Look for loose screws or parts.
- Lubricate Moving Parts: Apply lubricant to the moving parts of the mechanism. Be sure to use a product suitable for metal components.
- Adjust and Test: Make any necessary adjustments to the mechanism and test the chair to ensure the squeak is gone.
When to Seek Professional Help
If you’ve tried the above steps and the squeak persists, the seat mechanism might be significantly damaged. In such cases, contacting a professional for repair or replacement might be the best option.
Preventing Future Squeaks
Regular Maintenance Tips
Preventing future squeaks involves regular maintenance of your office chair:
- Regular Cleaning: Keep your chair clean by wiping it down regularly to prevent dirt buildup.
- Routine Checks: Periodically check for loose screws or bolts and tighten them as needed.
- Lubrication Schedule: Apply lubricant to the chair’s moving parts every few months to ensure smooth operation.
Using the Chair Properly
Avoid using the chair in ways that could cause excessive wear or damage:
- Avoid Excessive Force: Refrain from using excessive force when adjusting the chair.
- Proper Weight Distribution: Ensure the chair is used within its weight capacity to prevent undue stress on its components.
By following these steps and tips, you can effectively address and prevent squeaky noises in your office chair, ensuring a quieter and more comfortable work environment.
Dealing with Unusual Squeaking Sounds
Diagnosing Uncommon Noise Sources
Sometimes, a squeaky office chair can produce unusual noises that don’t fit typical patterns. Here are some additional diagnostic tips:
- Check for Misalignment: If the chair’s components are not properly aligned, it may produce odd noises. Look for any misaligned parts or gaps.
- Inspect the Upholstery: In some cases, the noise might come from the chair’s upholstery rubbing against other parts. Ensure the fabric or leather isn’t causing friction.
- Evaluate Weight Distribution: An uneven weight distribution on the chair might lead to unusual squeaks. Sit in different positions to see if the noise changes.
Addressing Unique Squeak Origins
If you identify an unusual noise source, specific actions may require:
- Realign Parts: If misalignment is the issue, adjust or reposition the components to ensure they are properly aligned.
- Adjust Upholstery: If the upholstery is causing the noise, adjust or reposition it. Ensure it is properly secure and not interfering with other parts.
- Check Weight Distribution: If the chair’s weight distribution seems uneven, adjust the seat or backrest to achieve a balanced weight distribution.
DIY vs. Professional Repair
When to Handle Repairs Yourself
Many minor squeaks can be fixed with basic tools and a bit of elbow grease. Here’s when DIY repair is typically sufficient:
- Simple Maintenance Issues: Cleaning and lubricating components like casters and the gas lift cylinder are usually straightforward and can be done at home.
- Loose Screws or Bolts: Tightening loose screws or bolts is often an easy fix that doesn’t require professional help.
- Routine Cleaning: Regular cleaning and maintenance tasks are usually manageable without professional assistance.